Microsoft 365
- Entra ID / Azure AD
- Microsoft Teams
- Sharepoint Online
- Exchange Online
- Installation Exchange Online PowerShell Modul
- Aufbewahrungsrichtlinie erstellen
- Konfiguration der authentifizierten SMTP-Übermittlung (SMTP AUTH)
- Send from Alias in Office 365
- Problem: Aliase können nicht hinzugefügt werden
- Defederating GoDaddy 365
- Problem: Domain kann nicht hinzugefügt werden
Entra ID / Azure AD
Microsoft Teams
Teams-Clientcache löschen
https://learn.microsoft.com/de-de/microsoftteams/troubleshoot/teams-administration/clear-teams-cache
Sharepoint Online
Ändern des SharePoint-Domänennamens
Schritt 1: Hinzufügen des neuen Domänennamens
-
Überprüfen Sie die Verfügbarkeit der gewünschten neuen Domäne. Wenn Sie beispielsweise möchten, dass Ihre SharePoint- und OneDrive-URLs mit
fabrikam.sharepoint.combeginnen, geben Siehttps://fabrikam.sharepoint.comin einen Browser ein. Wenn Sie eine Meldung erhalten, dass die Adresse nicht gefunden werden konnte (404), ist sie wahrscheinlich verfügbar. Wenn Sie einen Anmeldebildschirm oder eine Meldung erhalten, dass Ihr Benutzername im verzeichnis fabrikam.sharepoint.com nicht gefunden werden konnte, wird die Domäne verwendet, und Sie müssen eine andere Domäne ausprobieren. Wenn die Domäne bereits auf einem anderen Kunden registriert ist, können wir Ihnen keine Informationen gewehrleisten und können den Kunden nicht kontaktieren.-oder-
Wenn Sie die Domäne für ein anderes Abonnement besitzen, müssen Sie diesen Mandanten in der Microsoft Entra-ID löschen. Das Löschen eines Mandanten dauert in der Regel drei Tage, bis die Domäne verfügbar ist.
Warnung
Verwenden Sie die Domäne NICHT, um dieses Verfahren zuerst in einer Testumgebung zu testen. Wenn Sie dies tun, werden Sie die Domäne nicht für Ihre Produktionsumgebung verwenden können.
-
Fügen Sie Ihre neue .onmicrosoft.com-Domäne über die Seite Domänen im M365 Admin Center hinzu.
- Verwenden Sie nicht die Option "Domäne hinzufügen", die direkt auf der Seite Domänen vorhanden ist, da dadurch keine .onmicrosoft.com-Domäne erstellt wird. Führen Sie die Schritte im obigen Link aus, um einen ordnungsgemäß zu erstellen.
- Machen Sie diese Domäne nicht zu Ihrer Fallbackdomäne.
-
Wechseln Sie zurück zur Seite Domänen, und überprüfen Sie, ob die neu hinzugefügte DOMÄNE ".onmicrosoft.com" im Zustand "Fehlerfrei" angezeigt wird.
Schritt 2: Verwendung von Microsoft PowerShell zum Umbenennen Ihrer Domäne
Warnung
- Das Ändern Ihres SharePoint-Domänennamens kann abhängig von der Anzahl Ihrer Websites und OneDrive-Benutzer mehrere Stunden bis Tage dauern. Es wird dringend empfohlen, diese Änderung in einem Zeitraum mit geringer Nutzung (wie z. B. an einem Wochenende) durchzuführen, und die Benutzer anzuweisen, während der Änderung den Zugriff auf SharePoint- und OneDrive-Inhalte zu vermeiden. Darüber hinaus werden alle Aktionen, die neue OneDrives und Websites erstellen (wie z. B. das Erstellen eines neuen Teams oder privaten Kanals in Microsoft Teams), während der Umbenennung vorübergehend blockiert.
- Planen Sie keine UPN-Änderungen oder -Umbenennungen, während die Änderung Ihres SharePoint-Domänennamens ausgeführt wird. Wenn Sie eine Derart ausführen müssen, tun Sie dies, nachdem die Änderung des Domänennamens abgeschlossen ist.
-
ERFORDERLICH - Laden Sie die neueste SharePoint Online-Verwaltungsshell herunter. Wenn Sie eine frühere Version der Microsoft Office SharePoint Online-Verwaltungsshell installiert haben, gehen Sie zu "Programme hinzufügen oder entfernen", und deinstallieren Sie "SharePoint Online-Verwaltungsshell". Überprüfen Sie die Systemanforderungen und Installationsanweisungen. Die App wird auf dem Mac nicht unterstützt.
-
Stellen Sie eine Verbindung mit SharePoint als SharePoint-Administrator in Microsoft 365 her. Eine Anleitung dazu finden Sie unter Erste Schritte mit der Microsoft Office SharePoint Online-Verwaltungsshell.
Beispiel:
Connect-SPOService -Url "https://contoso-admin.sharepoint.com" -
Führen Sie den folgenden Befehl aus, um den neuen Domänennamen anzugeben:
PowerShellStart-SPOTenantRename -DomainName <DomainName> -ScheduledDateTime <YYYY-MM-DDTHH:MM:SS> [-WhatIf] [-Confirm]Dabei ist „DomainName“ der Teil vor „sharepoint.com“ oder „onmicrosoft.com“, und „ScheduledDateTime“ liegt mindestens 24 Stunden in der Zukunft, aber nicht mehr als 30 Tage. Die von Ihnen eingegebene Uhrzeit basiert auf dem aktuellen Datum und der aktuellen Uhrzeit des Computers, den Sie verwenden.
Beispiel:
Start-SPOTenantRename -DomainName "fabrikam" -ScheduledDateTime "2021-12-31T10:25:00"Wenn der PowerShell-Befehl „Start-SPOTenantRename“ nicht gefunden wird oder nichts zurückgegeben wird, stellen Sie sicher, dass Sie die neueste SharePoint Online-Verwaltungsshell installiert haben. Vor der Installation der neuesten Version müssen Sie möglicherweise alle vorherigen Versionen deinstallieren, indem Sie
Uninstall-Module Microsoft.Online.SharePoint.PowerShell -Force -AllVersionsausführen. Weitere Informationen zum Cmdlet „Start-SPOTenantRename“ finden Sie unter Start-SPOTenantRename.
Um eine Umbenennung vor dem Start abzubrechen, können Sie ausführen Stop-SPOTenantRename. Weitere Informationen zu diesem Cmdlet
https://learn.microsoft.com/de-ch/sharepoint/change-your-sharepoint-domain-name
Exchange Online
Installation Exchange Online PowerShell Modul
Einleitung
Das Exchange Online PowerShell Modul (kurz EXO V3 Modul) ermöglicht Administratoren, eine Verbindung zu ihrem Exchange Online-Mandant in Microsoft 365 herzustellen, um Daten abzurufen, neue Objekte zu erstellen, vorhandene Objekte zu aktualisieren, Objekte zu entfernen sowie Exchange Online und seine Funktionen zu konfigurieren.
Installation
PowerShell Ausführungsrichtlinie anpassen (Execution Policy)
Standardmässig können wir keine Skripte installieren. Um zu gewährleisten, dass alle heruntergeladenen PowerShell-Skripte aus dem Internet von einem vertrauenswürdigen Herausgeber signiert sind, führen Sie PowerShell als Administrator aus und führen Sie den folgenden Befehl aus:
Set-ExecutionPolicy RemoteSignedHinweis: Schliessen und öffnen Sie das erhöhte Windows PowerShell-Fenster erneut, damit die Änderungen wirksam werden.
PowerShellGet Modul installieren
Führen Sie PowerShell als Administrator aus. Führen Sie den Befehl Install-Module PowershellGet -Force aus. Wenn Sie gefragt werden, ob Sie den NuGet Provider installieren möchten, drücken Sie Y.
Install-Module PowershellGet -ForceExchane Online Management Modul installieren
Um das Exchange Online PowerShell Modul zu installieren, müssen wir Install-Module -Name ExchangeOnlineManagement -Forceausführen.
Install-Module -Name ExchangeOnlineManagement -ForceVerbinden mit Exchange Online
Verbinden Sie sich mit dem Exchange Online PowerShell unter Verwendung des EXO V3-Moduls, mit oder ohne MFA.
Hinweis: Wir empfehlen die Einrichtung von MFA (Multi-Faktor-Authentifizierung) auf den Konten.
Verbinden Sie Ihren Administrator-Account mit Exchange Online. Führen Sie das Cmdlet Connect-ExchangeOnline aus.
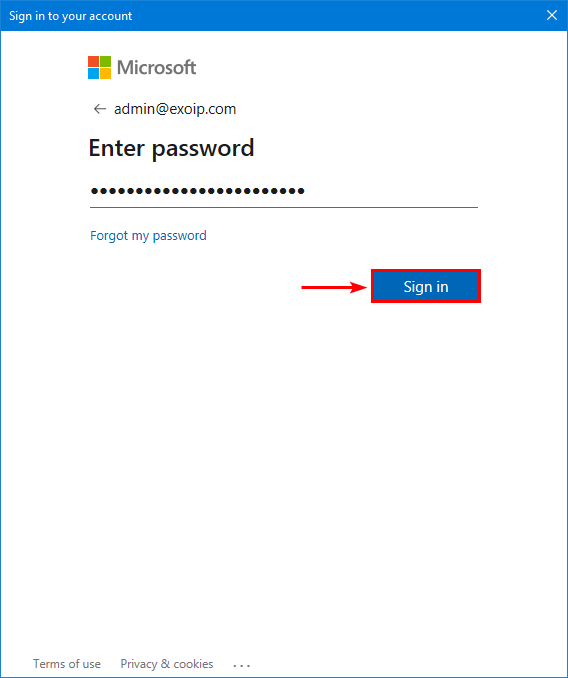
Connect-ExchangeOnline -UserPrincipalName admin@exoip.comIm angezeigten Anmeldefenster geben Sie Ihr Passwort ein und klicken auf Anmelden.
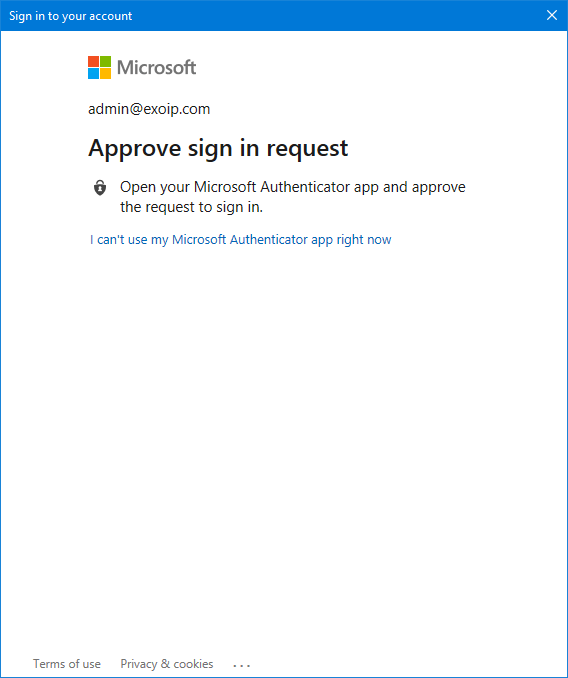
Wenn MFA aktiviert ist, wird ein Bestätigungscode generiert und je nach Ihren konfigurierten Einstellungen für die Authentifizierung geliefert. Zum Beispiel per SMS oder über die Microsoft Authenticator-App auf Ihrem Mobiltelefon
Neue Cmdlets in Exchange Online PowerShell V3
Trennen von Exchange Online
Trennen Sie die Remote PowerShell-Sitzung, wenn Sie fertig sind. Wenn Sie das Fenster des Exchange Online PowerShell Moduls schließen, ohne die Sitzung zu trennen, können Sie alle verfügbaren Remote-PowerShell-Sitzungen verbrauchen und müssen warten, bis die Sitzungen ablaufen.
Disconnect-ExchangeOnline -Confirm:$falseAufbewahrungsrichtlinie erstellen
https://www.codetwo.com/admins-blog/archive-policy-in-microsoft-365/
Konfiguration der authentifizierten SMTP-Übermittlung (SMTP AUTH)
Einleitung
SMTP-Client-E-Mail-Übermittlungen (auch als authentifizierte SMTP-Übermittlungen oder SMTP AUTH bezeichnet) werden in den folgenden Szenarien in Office 365 und Microsoft 365 verwendet:
- Anwendungen, Berichterstellungsserver und multifunktionale Geräte, welche E-Mail-Nachrichten generieren und senden.
- POP3- und IMAP4-Clients. Diese Protokolle erlauben Clients nur das Empfangen von E-Mail-Nachrichten, sodass sie authentifiziertes SMTP für das Senden von E-Mail-Nachrichten verwenden müssen.
Nahezu alle modernen E-Mail-Clients, die eine Verbindung zu Exchange Online-Postfächern in Office 365 oder Microsoft 365 herstellen (z. B. Outlook, Outlook im Web, iOS-Mail, Outlook für iOS und Android usw.), verwenden kein SMTP AUTH zum Senden von E-Mail-Nachrichten.
SMTP AUTH ist per Standard in Ihrem Exchange Online Mandant deaktiviert. Und sollte nur für spezifische Konten (Postfächer) aktiviert werden.
SMTP AUTH in Ihrer Organisation deaktivieren
Sie können SMTP AUTH global für Ihre organization im EAC oder mithilfe von Exchange Online PowerShell deaktivieren (oder aktivieren).
Exchange Online-PowerShell
Führen Sie den folgenden Befehl aus, um SMTP AUTH global in Ihrem organization mit PowerShell zu deaktivieren:
Set-TransportConfig -SmtpClientAuthenticationDisabled $trueExchange Online Admincenter (EAC)
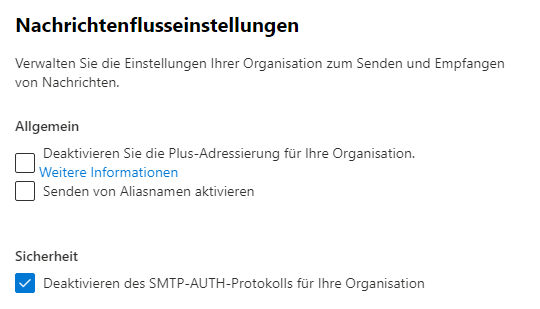
Um SMTP AUTH global in Ihrem organization im EAC zu deaktivieren, wechseln Sie in den EAC-Einstellungen zur Seite Nachrichtenflusseinstellungen, und wählen Sie Einstellung Deaktivieren des SMTP-AUTH-Protokolls für Ihre Organisation.
SMTP AUTH auf bestimmten Postfächern zu aktivieren
Per Exchange Online Admincenter (EAC)
Diese Einstellungen ist nur bei lizenzierten Posftächer möglich. Für freigegebene Postfächer ist die Konfiguration nur per Powershell möglich.
-
Öffnen Sie die Microsoft 365 Admin Center, und wechseln Sie zu Benutzer>Aktive Benutzer.
-
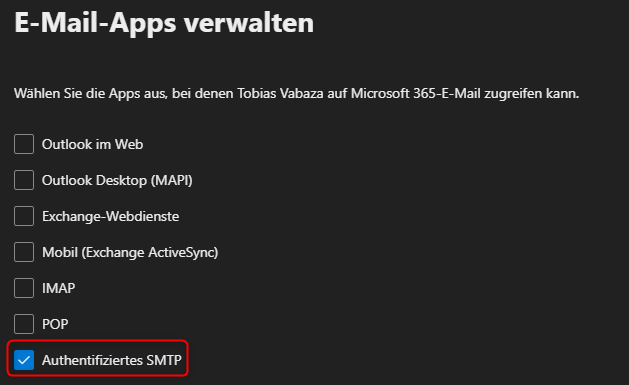
Wählen Sie den Benutzer aus, und wählen Sie im angezeigten Flyout E-Mail aus.
-
Wählen Sie im Abschnitt Email Apps die Option E-Mail-Apps verwalten aus.
-
Überprüfen Sie die Einstellung für Authentifiziertes SMTP: nicht ausgewählt = deaktiviert, ausgewählt = aktiviert.

Per Exchange Online-PowerShell
Verwenden Sie die folgende Syntax:
Set-CASMailbox -Identity <MailboxIdentity> -SmtpClientAuthenticationDisabled <$true | $false | $null>Der Wert „$null“ zeigt an, dass die Einstellung für das Postfach durch die globale Einstellung Ihrer Organisation gesteuert wird. Sie verwenden die Werte „$true“ (deaktiviert) oder „$false“ (aktiviert), um die Organisationseinstellungen zu überschreiben. Die Postfacheinstellung hat Vorrang vor der Organisationseinstellung.
In diesem Beispiel wird SMTP AUTH für das Postfach sean@contoso.comaktiviert:
Set-CASMailbox -Identity sean@contoso.com -SmtpClientAuthenticationDisabled $falseIn diesem Beispiel wird SMTP AUTH für das Postfach chris@contoso.comdeaktiviert.
Set-CASMailbox -Identity chris@contoso.com -SmtpClientAuthenticationDisabled $trueVerwenden von Exchange Online-PowerShell zum Aktivieren oder Deaktivieren von SMTP AUTH auf mehreren Postfächern
Verwenden Sie eine Textdatei, um die Postfächer zu identifizieren. Werte, die keine Leerzeichen enthalten (beispielsweise Alias, E-Mail-Adresse oder Kontoname) funktionieren am besten. Die Textdatei muss pro Zeile ein Postfach enthalten, so wie hier:
akol@contoso.comtjohnston@contoso.comkakers@contoso.com
Die Syntax verwendet die folgenden zwei Befehle (einen zum Identifizieren der Postfächer und den anderen zum Aktivieren von SMTP AUTH für diese Postfächer):
$<VariableName> = Get-Content "<text file>"
$<VariableName> | foreach {Set-CASMailbox -Identity $_ -SmtpClientAuthenticationDisabled <$true | $false | $null>}
Dieses Beispiel aktiviert SMTP AUTH für die Postfächer, die in der Datei C:\My Documents\Allow SMTP AUTH.txt angegeben wurden.
$Allow = Get-Content "C:\My Documents\Allow SMTP AUTH.txt"
$Allow | foreach {Set-CASMailbox -Identity $_ -SmtpClientAuthenticationDisabled $false}
Hinweis
Um SMTP AUTH für die Postfächer zu deaktivieren, verwenden Sie den Wert $true. Um den Organisationseinstellungen wieder die Kontrolle zu übergeben, verwenden Sie den Wert „$null“.
Woher wissen Sie, dass dieses Verfahren erfolgreich war?
Führen Sie einen der folgenden Schritte aus, um die erfolgreiche Aktivierung bzw. Deaktivierung von SMTP AUTH für ein bestimmtes Postfach zu überprüfen:
-
Einzelne Postfächer im Microsoft 365 Admin Center: Wechseln Sie zu Benutzer>Aktive Benutzer> wählen den Benutzer >E-Mail> aus, wählen Sie E-Mail-Apps verwalten aus, und überprüfen Sie den Wert von Authentifiziertes SMTP (aktiviert = aktiviert, deaktiviert = deaktiviert).
-
Einzelne Postfächer in Exchange Online PowerShell: Ersetzen Sie
<MailboxIdentity>durch den Namen, Alias, E-Mail-Adresse oder Kontoname des Postfachs. Führen Sie den folgenden Befehl aus und überprüfen Sie den Wert der Eigenschaft SmtpClientAuthenticationDisabled (False= aktiviert,True= deaktiviert, leer = Organisationseinstellung verwenden).PowerShellGet-CASMailbox -Identity <MailboxIdentity> | Format-List SmtpClientAuthenticationDisabled -
Alle Postfächer, bei denen SMTP AUTH deaktiviert ist: Führen Sie den folgenden Befehl aus:
PowerShell$Users = Get-CASMailbox -ResultSize unlimited $Users | where {$_.SmtpClientAuthenticationDisabled -eq $true} -
Alle Postfächer, bei denen SMTP AUTH aktiviert ist: Führen Sie den folgenden Befehl aus:
PowerShell$Users = Get-CASMailbox -ResultSize unlimited $Users | where {$_.SmtpClientAuthenticationDisabled -eq $false} -
Alle Postfächer, bei denen SMTP AUTH über die Organisationseinstellung gesteuert wird: Führen Sie den folgenden Befehl aus:
PowerShell$Users = Get-CASMailbox -ResultSize unlimited $Users | where {$_.SmtpClientAuthenticationDisabled -eq $null}
Send from Alias in Office 365
https://www.alitajran.com/send-from-alias/#h-check-aliases-in-office-365
https://www.reddit.com/r/Office365/comments/1478hli/sending_email_from_alias/
Problem: Aliase können nicht hinzugefügt werden
Defederating GoDaddy 365
SUMMARY AND BACKGROUND
Customers can purchase a Microsoft 365 subscription direct with GoDaddy along with their primary domain. When this occurs, GoDaddy federates this domain and tenant, making it unable to transfer under the CSP program or Direct to Microsoft. Moving and defederating this account has been a major pain point and area of confusion which this blog post addresses.
In the solutions proposed in this guide you can perform the following:
High level-steps:
A. Prepare your End Users
B. Become a Tenant Admin in GoDaddy
C. Remove Federation with GoDaddy
D. Reset Users Passwords
E. Add a CSP Provider or Move Direct to Microsoft
F. Provision Licensing into the Account
G. Remove GoDaddy as Delegated Admin
H. Cancel GoDaddy Subscription
Prepare Your End Users
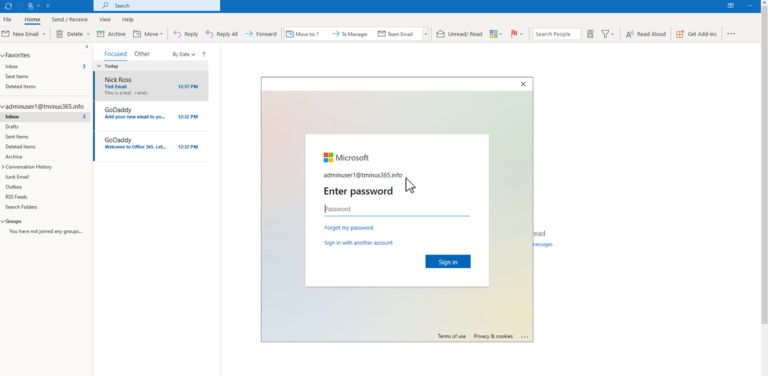
Become a Tenant Admin in GoDaddy
When a user sets up a 365 account directly with GoDaddy, they set up the initial user as an “admin” user but this user is redirected to the GoDaddy portal when trying to access the admin tab when going to Office.com. For this reason, we need to gain access to the true Global Admin so that we can perform the necessary powershell scripts to defederate the tenant.

Click on this user and reset their password. If you already have access to this user, you can disregard this step.
Once you have copied the temporary password, place it in a notepad and open an incognito window in the browser. In the browser, go to office.com and sign in with that username and temporary password. Establish a new password. With this completed, you now have a user that can run the necessary powershell commands in the future steps.
Remove Federation with GoDaddy
We can use the following PowerShell cmdlets to defederate the tenant. Note that you need to run PowerShell as administrator.
Write-Host "Checking for MSGraph module..."

$Module = Get-Module -Name "Microsoft.Graph.Identity.DirectoryManagement" -ListAvailable

if ($Module -eq $null) {

        Write-Host "MSGraph module not found, installing MSGraph"
        Install-Module -name Microsoft.Graph.Identity.DirectoryManagement

    }
Connect-MgGraph -Scopes "Directory.Read.All","Domain.Read.All","Domain.ReadWrite.All","Directory.AccessAsUser.All"
#Enter the Admin credentials from "Become a tenant Admin in GoDaddy"

Get-MgDomain
#See that the domain is “federated”#

Update-MgDomain -DomainId "<InsertFederatedDomain>" -Authentication Managed
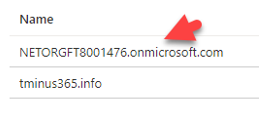
An example of a DomainId is “tminus365.com”. This would be the domain that was listed as federated that you want to covert to managed. After this is complete you will get a new commandline. You can run Get-MgDomain again and see that your domain is now “managed”.
Supporting CMDLET docs:
Reset Users Password
##########Connect to MsGraph##########
Write-Host "Checking for MSGraph module..."

$Module = Get-Module -Name "Microsoft.Graph.Users.Actionst" -ListAvailable

if ($Module -eq $null) {

        Write-Host "MSGraph module not found, installing MSGraph"
        Install-Module -name Microsoft.Graph.Users.Actions

    }
Connect-MgGraph
#Enter the Admin credentials from "Become a tenant Admin in GoDaddy"

############# Define CSV path of Users and Group ##################

$UserPath = Read-Host -Prompt "Enter File Path For CSV list of users"

#####Create CSV template with headers of Userprincipalname and Password#######

Import-Csv -Path $UserPath |%{Update-MgUserPassword -UserId $_.UserPrincipalName –NewPassword $_.Password}
Add a new Provider and Provision Licensing
Now that the tenant is defederated, you can add a CSP provider with their delegated admin link or go direct to Microsoft.
For CSP:
Paste the appropriate link in a browser and sign into the tenant with the Global Admin credentials if you are not already logged in. Accept the relationship. After the acceptance, reload the page and you will see a new CSP listed.
Order licensing for this customer. If you are not changing the subscription, then all you would need to do is provision the same amount of seats as you have today, remove them as delegated admin, and cancel with GoDaddy. There is no other action that would be required. License ownership would transfer and there will be no downtime for users.
If you are changing the subscriptions that are assigned to users (i.e. you are moving them from Business Standard to Business Premium as an example) you will need to perform the following steps:
For Microsoft Direct:
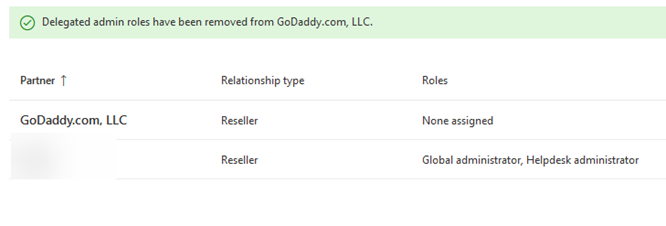
Remove GoDaddy as Delegated Admin and Cancel Subscription
In the 365 Admin Portal
Under Settings>Partner Relationships>Click on GoDaddy and remove their roles:

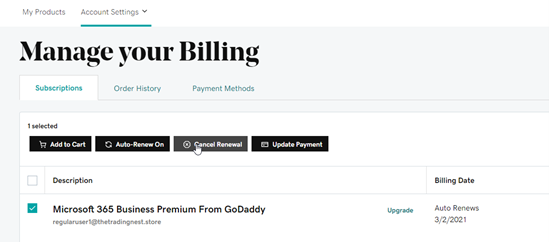
In GoDaddy, cancel the renewal:
Conclusion
From here, the subscription from GoDaddy will expire at end of term and that is all. You now have a tenant under CSP with all of the typical management functionality you are familiar with. Hope this provided some targeted guidance on defederating a GoDaddy tenant! Please share with the community!
Bonus: SharePoint URLs
The video below is a bit outdated but still gives you some visual context about what to do. Continue to follow the steps above as some of the powershell scripts shown are no longer necessary. I will look to update this video in the near feature.
Problem: Domain kann nicht hinzugefügt werden
